

Download / Go to madnerd.org / Videos
- What is libreConnect
- Devices
- Setup LibreConnect
- How libreConnect works
- Build your own applications
- Compile LibreConnect
- Use libreConnect on a Raspberry Pi
- Useful links / source
- License
What is libreConnect
LibreConnect is an application, to use any computer as a gateway for your connected objects.
When an arduino is plugged on a USB port, It generates a websocket which can be use on a web browser.

No installation or settings are required
- Download libreConnect
- Upload code on your arduino
- Click on usb_scanner
- Go to madnerd.org/interface to try my applications.
All applications are static web page, no data is sent to madnerd.org
You only need basic knowledge of HTML and JavaScript to build your own remote, to control leds, sensors, buttons, radio, anything!
No web server is required to use these applications, just a web browser.

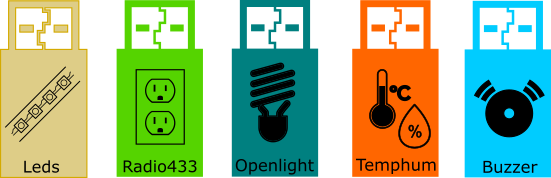
Devices
Here are the devices i build for LibreConnect, they are cheap and easy to make.
They are also easy to recycle and upgrade.
I also made some examples of what you can do with it:
- Control lamps and power outlets.
- Get notified when you received a call , using tasker for android
- Control a buzzer using any music software.
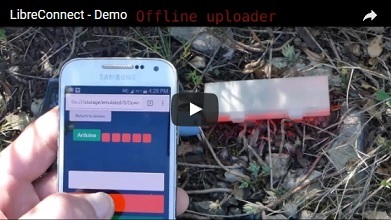
- Build and use devices in the wild! video
- Build your own web applications using your web browser
As long as your arduino code is able send/receive commands using USB serial.
You can use it with libreconnect.
You can easily convert any code you can find on the internet to work with libreConnect.

Setup LibreConnect
Arguments
While you don’t need to setup libreConnect, you can use arguments to
- Use your arduino only on your computer
- Encrypt / Password-protect your websocket
- Connect any arduino (or serial devices).
-h, --help           show this help message and exit
--serial SERIAL      Serial port
--port PORT          Websocket port
--secure             Add SSL
--power              Add power management (@reboot/@poweroff)
--password PASSWORD  Password for the websocket
--local              Websocket will only be available locally
--bantime BANTIME    Seconds before a ban user is unbanned
--retry RETRY        Number of retry before ban
--baudrate BAUDRATE  Baudrate for serial com
--keys KEYS          folders where SSL certificates are
--force              Connect any serial devices
--settings SETTINGS  Setting file
--debug              Debug Mode
--password_hash      Hashed password for websocket
Settings file (v1.1)
You can use a settings file (in ini) to pass arguments to usb_scanner and connector. You can find an example in libreconnect.ini.example (by default libreconnect.ini is used)
usb_scanner --settings settings/libreconnect.ini
Do not connect to network
If you want to use libreConnect only on the machine where it is plugged, just add –local. This is recommended if you are not on your own network. You can still use your web applications.
usb_scanner --local
Connect any arduino and other serial devices
You don’t need to modify your arduino code to use libreConnect, just use connector.exe directly. As libreConnect can’t guess the serial port of your device, You will need to specify the serial port / baudrate and websocket port.
./connector --serial "COM7" --baudrate 115200 --port 43100
You can also use this command
usb_scanner --force --baudrate 9600
This will connect any serial devices using baudrate 9600 starting with 40001.
Password hash (v1.2)
Generate a password hash (it is recommended to use it inside a settings file)
generate_password --password HorseBatteryStaple
usb_scanner --password_hash $argon2i$v=19$m=512,t=2,p=2$oGywE+G38a/7zx48GgG99A$NDvr/qtQ2tH4mJvUWN6zdg
Password
Hashed password is now available, it isn’t recommended to use this parameters.
I recommended using encrypted communication or your password will be sent unencrypted on your network.
If encryption is not possible, use temporary password.
usb_scanner --password HorseBatteryStaple
Here is how to log into your websocket.
password = HorseBatteryStaple
ws = new WebSocket("ws://localhost:42000");
ws.onmessage = ws_onmessage;


function ws_onmessage(event){
if(event.data == "@password"){
ws.send(password);
}
}
Ban time / Retry
You can ban ip that enters the wrong password too many times.
For example, here you can disconnect any user that failed to enter a password 5 times for 60 seconds.
usb_scanner --password HorseBatteryStaple --bantime 60 --retry 5
Encryption
By default, websockets are unencrypted To use an encrypted connection you need a SSL Certificate.
Self Signed Certificate
You can easily create a self-signed certificate, but your web browser will not connect to it before you validate it.
To validate a certificate , you need to go to the ip/port of your websocket:
https://ip:port
For example, https://localhost:42001
An SSL Certificate is available in keys/ if you want to test it, but it should not be considered secure, you need to build your own SSL certificate.
To connect your websocket in SSL, type:
usb_scanner --secure
You can use another folder for your certificate, by typing:
./usb_scanner --secure --keys "/etc/libreconnect/keys"
In scripts/, you can find a script (openssl.bat) to generate a new certificate.
Let’s encrypt Certificate
You can also generate a valid certificate, using let’s encrypt, but this isn’t an easy procedure and will only work if you use your websocket on the internet.
Source: https://certbot.eff.org/#pip-other
- You need to have a DNS domain (for examples devices.example.org) that redirected to your ip address
- Open port 80, on your router
- On a Raspberry Pi / Linux terminal, type:
wget https://dl.eff.org/certbot-auto
chmod a+x certbot-auto
This will download the software that will generate our certificate. Then you need to generate your certificate manually type:
./certbot-auto certonly --manual -d devices.example.org - Follow instructions, start a temporary web server with another terminal.
- Get certificate files, and copy it inside keys/
Power Management
If you want to be able to restart/stop your computer remotely, you can use –power
./usb_scanner --power
Then send using the websocket:
Turn off server: @poweroff
Reboot server: @reboot
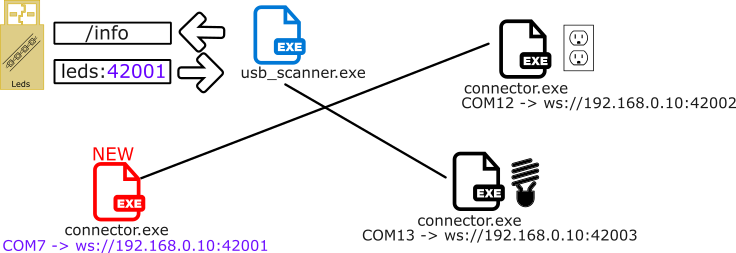
How libreConnect works
LibreConnect is two compiled python scripts:

- usb_scanner search for new USB serial devices plugged on your computer.
- It sends /info to each connected devices
- If the device returns device:port,
- it starts an instance of connector.exe to connect a serial port to a websocket using autobahn
Build your own applications
Compile LibreConnect
Use libreConnect on a Raspberry Pi
Useful links / source
Crossbar.io - Echo_tls Autobahn example
https://github.com/crossbario/autobahn-python/tree/master/examples/twisted/websocket/echo_tls
Simplyautomationized.blogspot.fr
5 ways to secure your raspberry pi’s websocket server
http://simplyautomationized.blogspot.fr/2015/09/5-ways-to-secure-websocket-rpi.html
madnerd.org - Control Arduino with a portable app
http://www.instructables.com/id/UTest-Make-USB-Devices-With-Arduino/
License
- LibreConnect : MIT - Rémi Sarrailh http://madnerd.org
- Autobahn : MIT - Crossbar.io http://autobahn.ws/python/
- Pyserial : BSD-3 - Chris Liechti https://github.com/pyserial/pyserial
- Twisted : MIT - Glyph Lefkowitz https://pypi.python.org/pypi/Twisted
- Icons / Images are from the https://thenounproject.com/ (Creative Commons By): Complete license